How to get your data from the Strava API using Python and stravalib#
In this tutorial, you will learn how to set up your Strava API application using Stravalib and Python to access data from Strava’s V3 REST API. After setting up authentication, you’ll also learn how to refresh your Strava token after it expires.
Steps to set up Strava API authentication#
Authentication involves 4 steps:
Create a Developer App: First, you will create a free developer application or “app” in your Strava account. You will use the credentials created by this app to connect to the Strava API.
Set Up Authentication: Next, you’ll configure your authentication to your Strava data by setting up permissions, known as “scopes.” Scopes determine what your app can access—-whether it’s just reading data or making changes to the data online on behalf of you or a user.
Log In and Authorize: When you log in to Strava and approve the scope permissions created in Step 2, Strava will provide a code. This code is used to request an access token from Strava that you can then use to make data requests.
Use and Refresh the Access Token: The access token created above allows you to interact with your Strava data for up to 6 hours. After the - hour time period, you can refresh your token using
stravalib.Client.refresh_token()as often as needed to continue accessing the API.
You only need to complete steps 1-3 once. Once you have a refresh_token value, you can continue to refresh your token whenever it expires, following Step 4 above.
Note
This example workflow is a local workflow that doesn’t rely on a web application tool like Flask. If you want to use Flask, we have a demo folder that provides a basic setup in the examples/strava-oath directory of the stravalib GitHub repository.
# You will use this to log in to your Strava account
import webbrowser
import json

from stravalib.client import Client

# Open the secrets file and store the client ID and client secret as objects, separated by a comma
# Read below to learn how to set up the app that provides you with the client ID
# and the client secret
client_id, client_secret = open("client_secrets.txt").read().strip().split(",")

# Create a client object
client = Client()
# Define your scope (this is read-only - see below for a "write" example which
# allows you to update activities and publish new activities to your Strava account).
# read_all allows read access for both private and public activities
request_scope = ["read_all", "profile:read_all", "activity:read_all"]

# Create a localhost URL for authorization (for local development)
redirect_url = "http://127.0.0.1:5000/authorization"

# Create authorization url; your app client_id required to authorize
url = client.authorization_url(
    client_id=client_id,
    redirect_uri=redirect_url,
    scope=request_scope,
)

# Open the URL in a web browser
webbrowser.open(url)

print(
    """You will see a url that looks like this. """,
    """http://127.0.0.1:5000/authorization?state=&code=12323423423423423423423550&scope=read,activity:read_all,profile:read_all,read_all")""",
    """Copy the values between code= and & in the url that you see in the
 browser. """,
)
# Using input allows you to copy the code into your Python console
# (or Jupyter Notebook)
code = input("Please enter the code that you received: ")
print(
    f"Great! Your code is {code}\n"
    "Next, I will exchange that code for a token.\n"
    "I only have to do this once."
)

# Exchange the code returned from Strava for an access token
token_response = client.exchange_code_for_token(
    client_id=client_id, client_secret=client_secret, code=code
)

token_response
# Example output of token_response
# {'access_token': 'value-here-123123123', 'refresh_token': # '123123123',
# 'expires_at': 1673665980}

# Get current athlete details
athlete = client.get_athlete()
# Print athlete name :) If this works, your connection is successful!
print(f"Hi, {athlete.firstname} Welcome to stravalib!")

# You are now successfully authenticated!
Below you will get a detailed overview of the above steps. You will also learn how to refresh your access token after the 6-hour window has expired.
Step 1: create a developer app in your Strava account#
To begin, you need to create a free developer application in your Strava account. Click here and follow Strava’s steps to create a developer application.
The figures below are from the Strava setup link provided above. They show you:
The Strava application setup screen and
The Strava application, once it’s been set up with the client ID and access token values.

Figure from the Strava documentation showing the application settings. You can
name your application whatever you wish. You can add any website URL if you are grabbing your data locally. For this tutorial, use localhost for the Authorization Callback
Domain if you are only using this locally. Otherwise, you likely have a website
URL that you will enter here.#
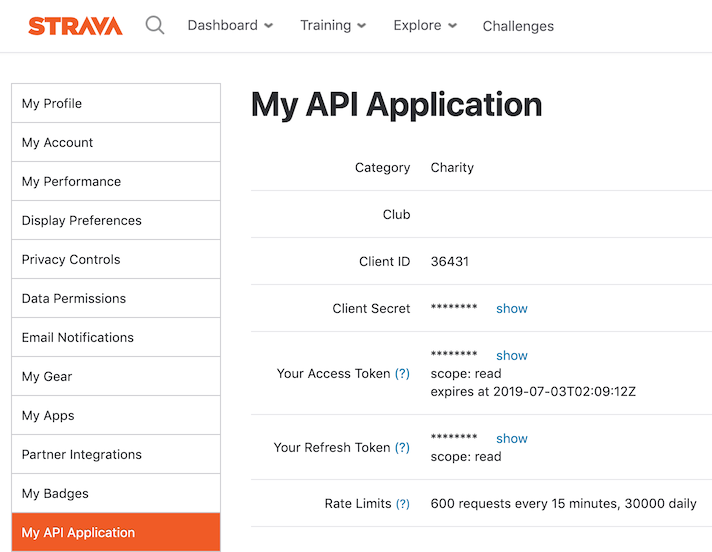
Figure from the Strava documentation showing the application settings. This screenshot shows the final application you should have once you follow the steps above. Notice that you can see the access token scope and expiration time and date on the app page. These are values that you will work with below. Copy the Client ID and Client secret to a file (see below for more).#
Important
Remember to store your client ID and client secret values somewhere safe.
Do not EVER commit secrets or token values to .git or push it to GitHub (unless you have
encrypted it)!
Save your secret and access token values in a text file#
Notice that there is a client secret (hidden in the screenshot) and a token in the first screenshot above. Next, you will copy both the secret and the token to use (and reuse) in your code.
Do the following:
Create a
client_secrets.txtfile.Add the client secret and access token values on a single line separated by a comma in the format that you see below:
secret_value_here, access_token_value_here
Note
The format described above is not required for a Strava workflow. This is just an example of how to store relevant information that you will need to reuse if you intent to update the data in your workflow regularly. If you are creating a web application, you should store this information securely somewhere in your application’s database or web infrastructure.
Step 2: Setup Strava authentication#
Once you have created your client_secrets.txt file, you are ready to setup
authentication using Python.
At the top of your code, import the stravalib.client.Client class.
In this tutorial, you will also import webbrowser to launch a web browser from your code to
login to Strava. webbrowser behaves similarly to a web application.
# Use webbrowser to launch a browser from Python
import webbrowser
import json

from stravalib.client import Client
Next, read the client_id and access_token from the client_secrets.txt file that you created earlier. Then, create a stravalib Client() object.
Below, the client_id and access_token are read from the client_secrets.txt file. The .strip() method removes any extra spaces, and .split(",") separates the two values. You then create a Client() object from stravalib, which will be used to interact with the Strava API and manage your data.
# Read the client_id and access_token from the secrets file
client_id, access_token = open("client_secrets.txt").read().strip().split(",")

# Create a stravalib Client() object
client = Client()
The Client() object is what you’ll use to interact with Strava. It stores your authentication details and provides methods to:
Retrieve different types of data from Strava, such as activities and club data.
Modify activity and club data on Strava (if you have a token with write permissions).
You will learn more about read vs. write token scopes below.
Step 4: Use and refresh your Strava API token#
Strava provides you with an access token that is good for 6 hours. You can refresh the token as needed if you wish to grab more data after that 6-hour window has ended.
You can refresh the token using the
stravalib.client.Client.refresh_access_token() method.
Earlier, you saved the refresh_token and expires_at values to a JSON file. You can use the refresh token stored in the JSON file to refresh your token for another 6 hours of use as many times as needed.
This might be most useful if you try to process your data again–for example, the next day and you don’t have the refresh token value stored and accessible to Python.
# Open the token JSON file that you saved earlier
with open(json_path, "r") as f:
    token_response_refresh = json.load(f)

print(token_response_refresh)

# Output:
# {'access_token': 'ab0667a99d17b7c278d9f730f733ad09016306cf',
# 'refresh_token':  '9f8d5689c93e83c7b0c69a8585010d4762e8b2ac',
#  'expires_at': 1726560054}
refresh_response = client.refresh_access_token(
    client_id=client_id,  # Stored in the secrets.txt file above
    client_secret=client_secret,
    refresh_token=refresh_token,  # Stored in your JSON file
)

# Check that the refresh worked
client.get_athlete()

# View the newly refreshed token
print(client.access_token)
Wrap up#
You now know how to:
Setup an app within your Strava account
Connect that app to your Python code using stravalib
Request and refresh a token that allows you to request and update data in your Strava account