Development Guide for Contributing to Stravalib#
Note
Please make sure that you’ve read our contributing guide before reading this guide.
If you are looking for information on our package build structure and release workflow please see our build and release guide
The steps to get started with contributing to stravalib are below. You will begin by forking and cloning our Github repository.
Fork and clone the stravalib repository#
1. Fork the repository on GitHub#
To create your own copy of the stravalib repository on GitHub, navigate to the stravalib/stravalib repository and click the Fork button in the top-right corner of the page.
2. Clone your fork locally#
Next, use git clone to create a local copy of your stravalib forked
repository on your local filesystem:
$ git clone git@github.com:your_name_here/stravalib.git
$ cd stravalib/
Once you have cloned your forked repository locally, you are ready to create a development environment.
Setup a local development environment#
We suggest that you create a virtual environment on your computer to work on
stravalib. Below, we show you how to do that using a conda environment. However,
you are welcome to use pip / virtualenv or whatever environment manager that
you prefer!
Create your local development environment using conda#
The instructions below assume that you have a conda enabled Python distribution. Anaconda and miniconda are examples of two conda python distributions. If you are unsure of which distribution to use, we suggest miniconda as it is a lighter weight installation that will minimize environment conflicts given it has fewer packages and tools bundled with it compared to the much larger Anaconda distribution.
To begin, install the conda environment.
This will create a local conda environment called stravalib_dev
$ conda env create -f environment.yml
Next, activate the environment.
$ conda activate stravalib_dev
Finally install the package dependencies and the stravalib package in
development / editable mode (-e). Editable mode allows you to make updates
to the package and test them in realtime.
# install the package requirements
$ pip install -r requirements.txt
# Install stravalib in editable mode
$ pip install -e .
Architecture Overview#
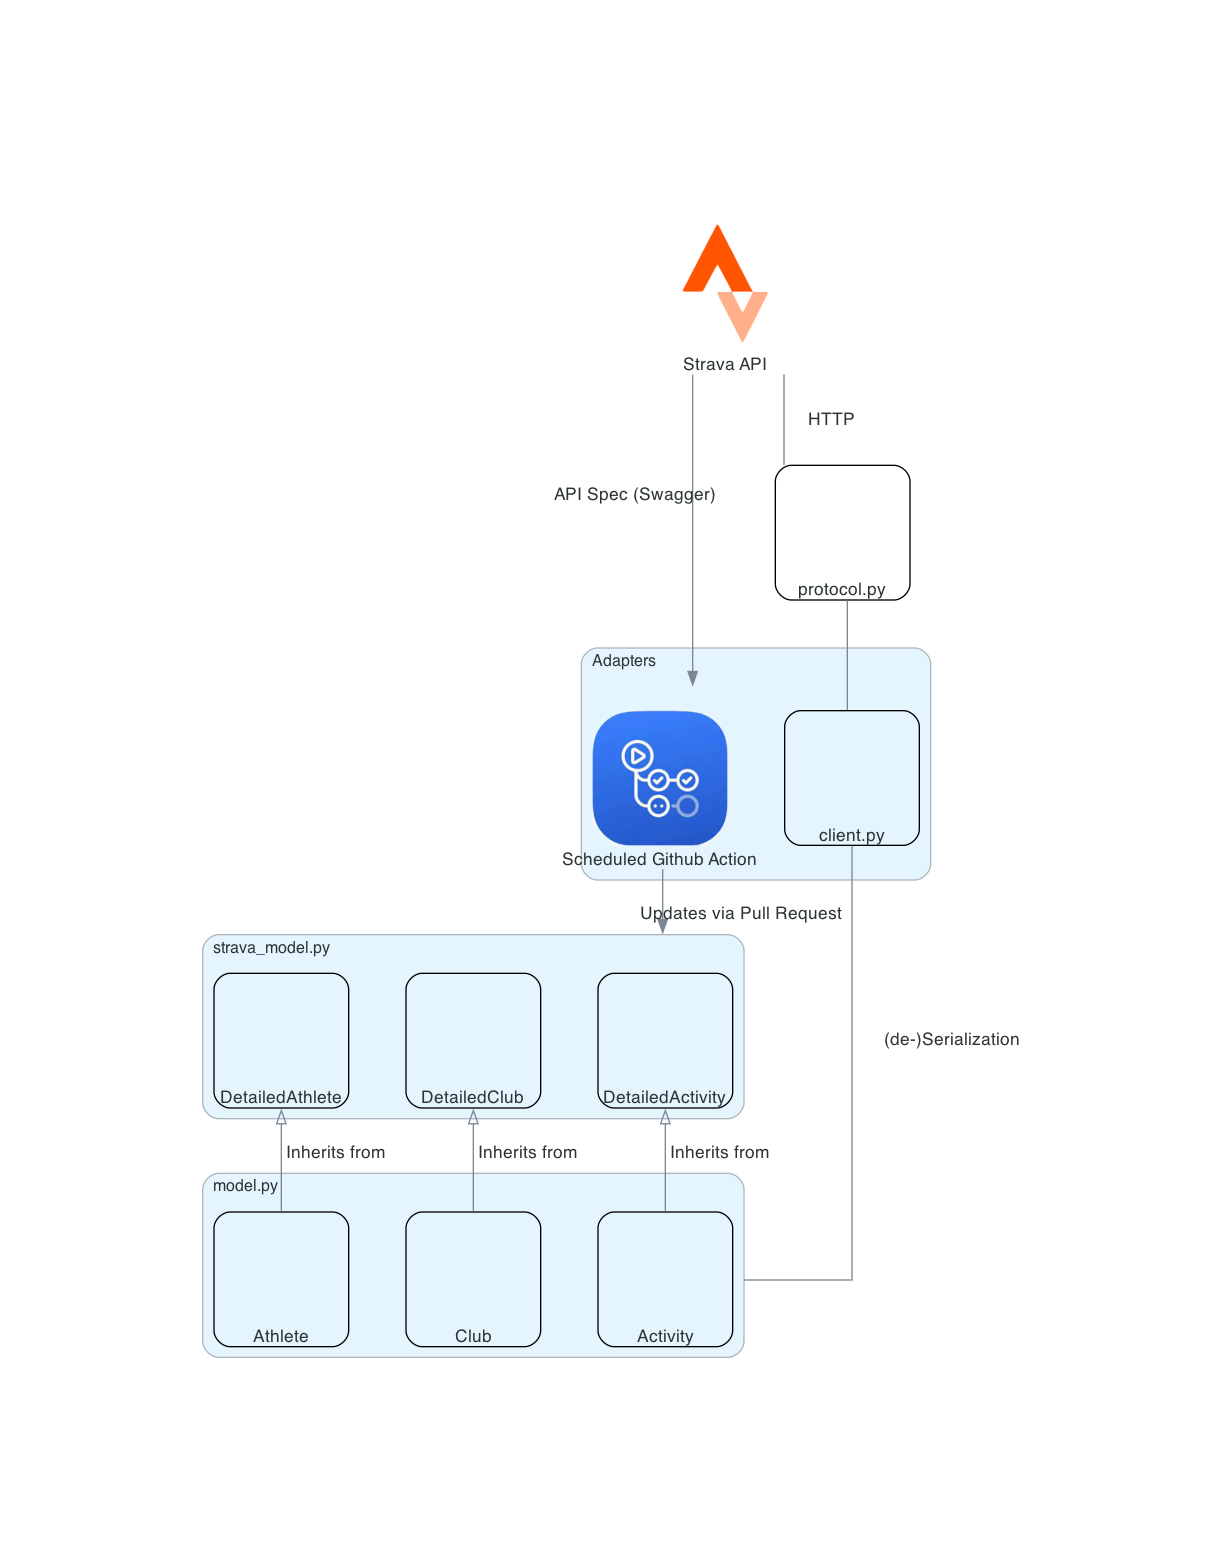
Stravalib contains the following main components:
At the core, a (pydantic) domain model is generated and updated by a bot via
pull requests. This model reflects the officially published API specification
by Strava and is stored in the module strava_model.py. This file should never
be edited manually. Instead, the stravalib bot will suggest changes to the
model through pull requests that can then be merged by stravalib maintainers.
The module model.py contains classes that inherit from the
official Strava domain model in strava_model.py. This module supports custom
typing, unit conversion, (de-)serialization behavior, and support for
undocumented Strava features.
The module protocol.py manages the sending of HTTP requests
to Strava and handling the received responses (including rate limiting).
It is used by methods in client.py to de-serialize raw response data into
the domain entities in model.py.
Code style, linting & typing#
We use the following tools to ensure consistent code format that follows the Python Enhancement Protocol (PEP) 008 standards. These standards dictate best practices for Python code readability and consistency:
black for consistent code format that generally follows PEP 8 guidelines. Because black’s default line length is 88 characters, we adjust it to 79 characters in the config to follow PEP 8 line width guidelines.
isort: ensure imports are ordered following PEP 8 import guidelines
flake8: flake8 is a linter. It identifies other PEP 8 issues in the code that Black will not address including comments that extend beyond 79 characters and doc string line width. It also will identify unused imports and unused but declared variables.
For local development, you can use our pre-commit hook setup.
When installed, the pre-commit hook will run each code format
tool, specified in the pre-commit-config.yaml file, every time you make a
commit to your local clone of stravalib. If your code doesn’t “pass” checks for
each tool then the following happens:
If it’s a
blackorisorterror, the code will be fixed / updated by black and/or isort.If it’s a
flake8error, flake8 will provide you with a list of issues in your code. You will need to fix each individually by hand.
Setup and run the pre-commit hooks#
To setup the pre-commit hook locally, run:
$ pre-commit install
The tools installed will be the ones listed in the .pre-commit-config.yaml file.
Tip
You can run all hooks locally without a commit by using:
$ .git/hooks/pre-commit
You can also run a single hook using the following:
# Only run isort
# pre-commit run isort
Pre-commit.ci bot#
We use the https://pre-commit.ci, in addition to pre-commit in our local
build to manage pull requests. The configuration for this bot can be found
in the ci: section of the pre-commit-config.yaml file.
This bot can run all of the code format hooks on every pull request if it’s set
to do so.
Currently, we have the bot setup to only run when it’s asked to run on a PR. To call the bot on a pull request, add the text:
pre-commit.ci run
as a single line comment in the pull request. The bot will automatically run all of the hooks that it is configured to run.
Tip
If you have an open Pull Request but you need to make some changes locally, and the bot has already run on your pull request and added a commit, you can force push to the pull request to avoid multiple bot commits.
To do this simply:
Do not pull down any changes from the pull request,
Commit your changes locally,
When you are ready to push your local changes use:
git push origin branch-name-here --force
If you have not yet pulled down pre-commit bot’s changes, this will force the branch to be in the same commit state as your local branch.
Typing using mypy#
To ensure proper typing throughout our library we use mypy. To run mypy across python versions use:
nox -s mypy
Similar to running tests, if you are missing a version of Python, nox will skip that run and continue to the next version.
❯ nox -s mypy
nox > Running session mypy-3.8
nox > Missing interpreters will error by default on CI systems.
nox > Session mypy-3.8 skipped: Python interpreter 3.8 not found.
nox > Running session mypy-3.9
Code format and syntax#
If you are contributing code to stravalib, please be sure to follow PEP 8
syntax best practices.
Docstrings#
All docstrings should follow the numpy style guide. All functions/classes/methods should have docstrings with a full description of all arguments and return values.
Warning
This also will be updated once we implement a code styler While the maximum line length for code is automatically set by Black, docstrings must be formatted manually. To play nicely with Jupyter and IPython, limit docstrings to 79 characters per line.
About the stravalib test suite#
Tests for stravalib are developed and run using pytest. We have two
sets of tests that you can run:
functional end-to-end test suite: this test set requires an API key to run.
unit tests that are setup to run on CI. These tests use mock instances of the API to avoid needed to setup an API key yourself locally.
Unit - and integration test suite#
Warning
We will add more information about the test suite in the near future.
For integration tests that should be run independently from Strava, there’s a
pytest fixture :func:~stravalib.tests.integration.conftest.mock_strava_api
that is based on :class:responses.RequestsMock.
This fixture, prevents requests being made to the actual Strava API and instead
registers responses that are based on examples from the published Strava API
documentation. Example usages of this fixture can be found in the
:mod:stravalib.tests.integration.test_client module.
We have setup the test suite to run on the stravalib package as installed.
Thus when running your tests it is critical that you have a stravalib
development environment setup and activated with the stravalib package
installed from your fork using pip pip install .
You can run the tests using make as specified below. Note that when you run the tests this way, they will run in a temporary environment to ensure that they are running against the installed version of the package that you are working on.
To run the test suite across all python versions that we support use:
nox -s test
nox -s test does a few things:
It create a temporary directory called
tmp-test-dir-stravalibin which your tests are run. We create this test directory to ensure that tests are being run against the installed version of stravalib (with the most recent local development changes as installed) rather than the flat files located in the GitHub repository.It runs the tests and provides output (see below)
Finally it removes the temporary directory
If you are a conda/mamba user, you can use:
nox -s test_mamba
Functional end-to-end test suite#
The functional (end-to-end) test suite is set up to hit the STRAVA api. You will thus need an app setup in your Strava account to run the test suite. We recommend that you create a dummy account for this with a single activity to avoid any chances of your data being unintentionally modified. Once you have the app setup and a valid access_token for an account with at least one activity, follow the steps below.
Rename the file
stravalib/stravalib/tests/test.ini-exampletotest.iniAdd your API token to the file by replacing:
access_token = xxxxxxxxxxxxxxxx
with:
access_token = your-authentication-token-value-here
NOTE: this token needs to have write access to your account. We recommend that you create a dummy account to ensure you aren’t modifying your actual account data.
Add a single activity id to your dummy account using stravalib:
activity_id = a-valid-activity-id-here
You are now ready to run the test suite. To run tests on python 3.x run:
$ pytest
Test code coverage#
We use pytest-cov to calculate
test coverage. When you run nox -s tests pytest-cov will provide you with
coverage outputs locally. You can ignore the returned values for any files in
the test directory.
Example output from nox -s test:
pytest --cov stravalib stravalib/tests/unit stravalib/tests/integration
=================================================== test session starts ===================================================
platform darwin -- Python 3.8.13, pytest-7.2.0, pluggy-1.0.0
rootdir: .../stravalib
plugins: cov-4.0.0
collected 105 items

stravalib/tests/unit/test_attributes.py ...............                                                             [ 14%]
stravalib/tests/unit/test_client_utils.py .......                                                                   [ 20%]
stravalib/tests/unit/test_limiter.py .............                                                                  [ 33%]
stravalib/tests/unit/test_model.py .......                                                                          [ 40%]
stravalib/tests/integration/test_client.py ...............................................................          [100%]

---------- coverage: platform darwin, python 3.8.13-final-0 ----------
Name                                                     Stmts   Miss  Cover
----------------------------------------------------------------------------
stravalib/__init__.py                                        2      0   100%
stravalib/_version.py                                        2      0   100%
stravalib/_version_generated.py                              2      0   100%
stravalib/attributes.py                                    170     19    89%
stravalib/client.py                                        439    180    59%
stravalib/exc.py                                            34      3    91%
stravalib/model.py                                         709    126    82%
stravalib/protocol.py                                      130     39    70%
stravalib/unithelper.py                                     16      1    94%
stravalib/util/__init__.py                                   0      0   100%
stravalib/util/limiter.py                                  122     27    78%
----------------------------------------------------------------------------
TOTAL
Code coverage reporting on pull requests with codecov#
We use an integration with codecov.io to report test coverage changes on every pull request. This report will appear in your pull request once all of the GitHub action checks have run.
Note
The actual code coverage report is
uploaded on the GitHub action run on ubuntu and Python 3.9. When that step in the
actions completes, the report will be processed and returned to the pull request.
Documentation#
Stravalib documentation is created using sphinx and the
furo theme.
Stravalib documentation is hosted on ReadtheDocs.
The final online build that you see on readthedocs happens on the readthedocs website. Our continuous integration GitHub action only tests that the documentation builds correctly. It also tests for broken links.
The readthedocs build is configured using the .readthedocs.yml file rather than
from within the readthedocs interface as recommended by the readthedocs website.
The badge below (also on our README.md file) tells you whether the
readthedocs build is passing or failing.
Currently @hozn, @lwasser and @jsamoocha have access to the readthedocs stravalib
documentation build
Online documentation will be updated on all merges to the main branch of
stravalib.
Build documentation locally#
To build the documentation, first activate your stravalib development environment which has all of the packages required to build the documentation. Then, use the command:
$ nox -s docs
This command:
Builds documentation
Builds
stravalibAPI reference documentation using docstrings within the packageChecks for broken links
After running nox -s docs you can view the built documentation in a web
browser locally by opening the following file on your computer:
/your-path-to-stravalib-dir/stravalib/docs/_build/html/index.html
You can also view any broken links in the output.txt file located here:
/your-path-to-stravalib-dir/stravalib/docs/_build/linkcheck/output.txt
Build locally with a live server#
We use sphinx-autobuild to build the documentation in a live web server.
This allows you to see your edits automatically as you are working on the
text files of the documentation. To run the live server use:
$ nox -s docs-live
Note
There is a quirk with autobuild where included files such as the CHANGELOG will not update live in your local rendered build until you update content on a file without included content.
Stravalib API Documentation#
Warning
ThIS SECTION WILL BE UPDATED IN THE NEAR FUTURE
The API reference is manually assembled in doc/api/index.rst.
The autodoc sphinx extension will automatically create pages for each
function/class/module listed there.
You can reference classes, functions, and modules from anywhere (including docstrings)
using :func:`package.module.function`,
:class:`package.module.class`, or
:mod:`package.module`.
Sphinx will create a link to the automatically generated page for that
function/class/module.
About the documentation CI build#
Once you create a pull request, GitHub actions will build the docs and
check for any syntax or url errors. Once the PR is approved and merged into the main branch of the stravalib/stravalib
repository, the docs will build and be available at the readthedocs website.
Cleanup of documentation and package build files#
To clean up all documentation build folders and files, run the following
command from the root of the stravalib directory:
$ nox -s clean-docs
To clean up build files such as the package .whl, and other temporary files
created when building stravalib distributions and running tests, run:
$ nox -s clean_build